Hey there! As a supplier of motor welding machines, I often get asked about how to install these nifty pieces of equipment. It might seem a bit daunting at first, but with the right steps and a bit of know - how, you'll have your motor welding machine up and running in no time.


1. Preparation
Before you even start unpacking the machine, there are a few things you need to take care of. First off, find a suitable location. The area should be well - ventilated because welding generates fumes that can be harmful if inhaled. You don't want to be working in a stuffy corner where the fumes just hang around. Also, make sure the floor is level. An uneven surface can cause the machine to wobble, which is not only dangerous but can also affect the quality of your welds.
Next, check the power supply. Different motor welding machines have different power requirements. You need to make sure that the electrical outlet you're using can handle the load. If you're not sure, it's a good idea to consult an electrician. You don't want to blow a fuse or, even worse, cause an electrical fire.
Now, let's talk about the tools you'll need. You'll definitely need a set of wrenches to tighten bolts and nuts. A screwdriver might come in handy too, especially if there are any panels that need to be removed or installed. And don't forget safety gear! You'll need welding gloves, a welding helmet, and safety glasses. Safety should always be your top priority when working with welding machines.
2. Unpacking and Inspection
Once you've got everything ready, it's time to unpack the motor welding machine. Carefully remove it from the packaging and check for any visible damage. Look for dents, scratches, or loose parts. If you find anything, don't start the installation. Contact our support team right away. We're here to help and make sure you get a machine in perfect condition.
While you're inspecting the machine, also check for all the accessories that should come with it. This might include welding torches, cables, and electrodes. Make sure everything is there and in good working condition.
3. Mounting the Machine
If your motor welding machine is a floor - standing model, you'll need to mount it on the floor. Most machines come with pre - drilled holes for this purpose. Line up the machine with the holes on the floor and insert the bolts. Use your wrenches to tighten them securely. Make sure the machine is firmly attached to the floor so that it doesn't move around during operation.
For wall - mounted models, you'll need to find a sturdy wall. Mark the positions of the mounting holes on the wall using a pencil. Drill holes in the wall and insert wall plugs. Then, attach the machine to the wall using bolts and tighten them. Again, ensure that the machine is level and stable.
4. Connecting the Cables
Now, it's time to connect the cables. There are usually two main types of cables: power cables and welding cables. The power cable is what connects the machine to the electrical outlet. Make sure you connect it properly, following the instructions in the user manual. The welding cables are used to connect the machine to the welding torch and the workpiece.
When connecting the cables, pay attention to the polarity. Some welding processes require a specific polarity for the best results. If you're not sure, refer to the manual or give us a shout. We can guide you through it.
5. Installing the Welding Torch
The welding torch is an important part of the motor welding machine. To install it, first, make sure the machine is turned off. Locate the torch connection on the machine and insert the torch cable. Tighten the connection using a wrench or a screwdriver, depending on the type of connection.
Once the torch is connected, check the gas supply if your machine uses gas for welding. Make sure the gas cylinder is properly connected and the valves are open. Adjust the gas flow rate according to the welding requirements.
6. Testing the Machine
Before you start welding for real, it's crucial to test the machine. Turn on the power and let the machine warm up for a few minutes. Check the display panel (if your machine has one) to make sure all the indicators are normal.
Next, perform a test weld on a scrap piece of metal. This will help you check if the machine is working properly and if the settings are correct. Pay attention to the arc stability, the quality of the weld bead, and the overall performance of the machine. If you notice any problems, such as a weak arc or uneven welds, stop immediately and troubleshoot the issue. You can also refer to the troubleshooting section in the manual or contact our support team.
Different Types of Motor Welding Machines
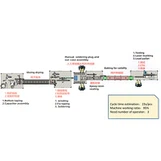
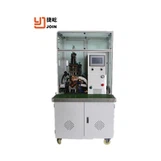
We offer a variety of motor welding machines to meet different needs. For example, the Rotor Resistance Welding Machine is great for welding rotors. It uses resistance welding technology to create strong and reliable joints.
The Stator Arc Welding Machine is another popular option. It uses arc welding to join stator components. This machine is known for its high - quality welds and ease of use.
And if you're looking for a more advanced option, the Stator Laser Welding Machine is the way to go. Laser welding offers precise and clean welds, making it ideal for high - precision applications.
Conclusion
Installing a motor welding machine might seem like a big task, but if you follow these steps, you'll be able to do it with ease. Remember, safety is key, so always wear the proper safety gear and follow the instructions in the manual.
If you have any questions during the installation process or if you're thinking about purchasing a motor welding machine, don't hesitate to reach out. We're here to provide you with the best products and support. Whether you're a professional welder or just starting out, we've got the right machine for you.
References
- Manufacturer's user manual for motor welding machines
- Industry standards for welding machine installation and operation